Contents
Posting
If you would like to write and share a post (publish, although the circle of recipients or those who can see the post may be restricted), you can usually do this via the ‘Share’ field located above the stream. Click on this field to open the post editor.
At the top is the field for the post title (optional), below this is the field for the summary (also optional), if the administrator of your hub allows this function. The summary can also be used for the purpose of a content warning. Below the field for the summary is a field for categories (if activated by the admin). Below this is the text field in which you can create the post content. Depending on the Hub settings, you can use plain text, Markdown, bbCode or HTML for formatting the text.
At the bottom of the post editor there are some buttons for easier formatting of the content and for inserting elements and using additional functions: bold, italic, underline, quote, code, attach/upload file, insert link, insert image (an image that already exists under Files), insert location, set expiry date for the post, set publication date, encrypt text, vote (poll) on/off, deactivate comments. To the right of this is another block with buttons. Here you can display a preview of the post, specify whether the post should be published on other networks, make the authorisation settings (who can see the post) and finally publish it using the ‘Share’ button.

You can also access the post editor by selecting the corresponding menu item in the app menu (top right ⋮) or the corresponding icon in the navigation bar (if you have pinned the ‘Write post’ app).
Commenting
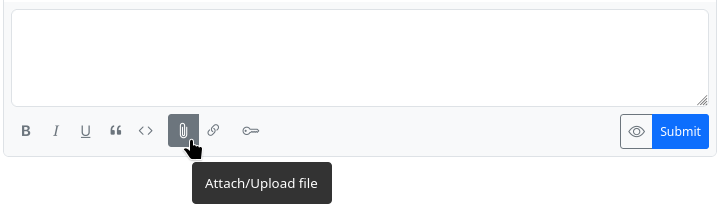
If you want to comment on a post, i.e. reply to it, click in the field at the bottom of the post (‘Comment’). This opens the comment editor, which is similar to the post editor. However, there are no fields for a title, a summary or categories. Below the input field for the content of the comment there are again buttons for certain formatting (not all that are available in the post editor, because not everything is possible in a comment) and on the right again a button for a preview, as well as a ‘Submit’ button to publish the comment.

You can also mark up the text in the comment content field with Markdown, bbCode and HTML.
As there is no field for a summary, it is not possible to use this for a content warning regarding the comment. However, this can be achieved using bbCode by inserting the content warning in [summary][/summary]. This initially hides all of the following content, which can then be displayed by clicking on it.
Insert images
There are various ways to insert images into posts and comments.
In the post editor
There are two buttons in the post editor that allow you to insert images: ‘Embed image’ and ‘Attach/upload file’.
With ‘Embed image’, you can insert an image that already exists in the cloud into the post. The image must therefore either be available or you can upload it for precisely this purpose, e.g. using the ‘Files’ app.
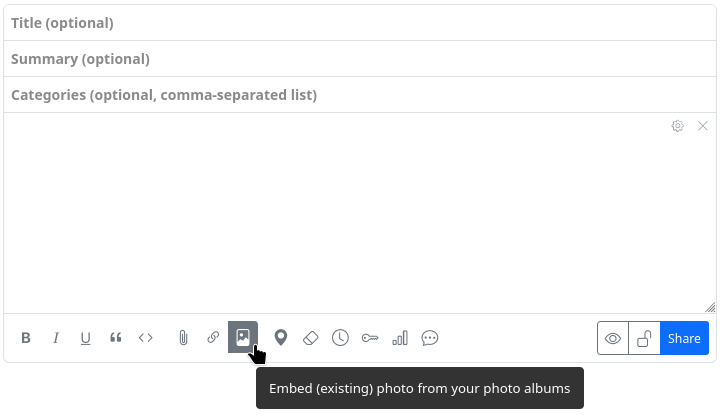
If you select this button, an overview of the available image files opens and you only have to select and click on the appropriate image. Please note: After selecting the image to be inserted, the selection window must be closed again. It does not close automatically after inserting an image so that you have the option of inserting several images in one go.
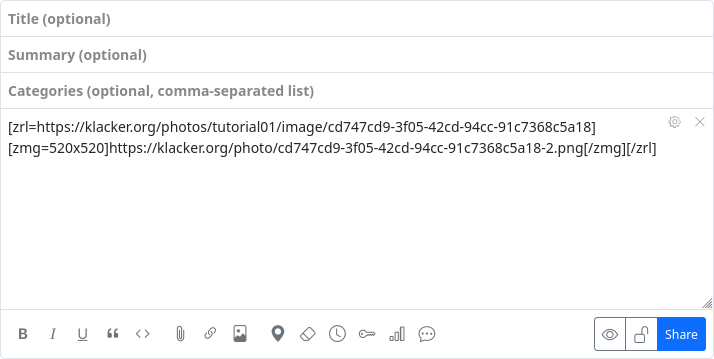
Once selected, the image, scaled to its original size, is inserted as a clickable link to the source file using the bbCode tags [zrl][zmg][/zmg][/zrl] at the end of the previous post (not at the current text cursor position).
With ‘Attach/upload file’ an image can be uploaded directly from your own device and embedded at the end of the post.
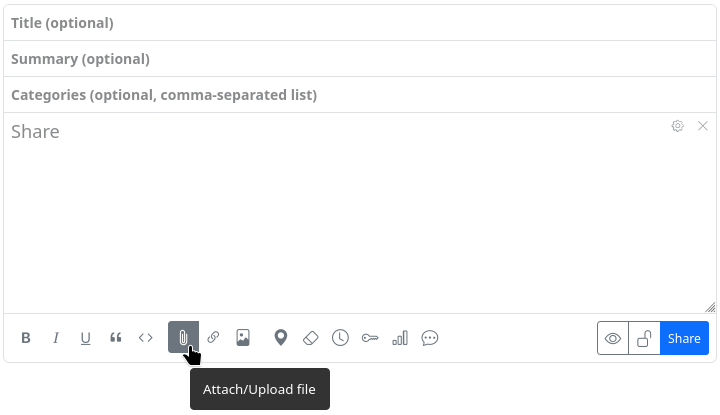
A file selection dialogue opens where you can select and upload the image on your own device. It is uploaded to an automatically created subdirectory in the cloud and inserted at the end of the previous post using the bbCode tags [zrl][zmg][/zmg][/zrl].
Please note: With this method, the image is not scaled to its original size but displayed as a smaller preview image if there is no continuous text. As a result, you may see a chequered background around the image.

In the comment editor
The comment editor only offers the option of uploading and embedding an image. The button for inserting an existing image does not exist there.
If you still want to insert an existing image, you must do this manually using the tags [img][/img] or [img=URL][/img]. To do this, you need to know the URL of the image. In this way, you can also insert images from external sources on the web.
If you use [img=WIDTHxHEIGHT][/img], you can scale the image.
Alt text
If you want an alternative text (alt text) to be displayed when the image cannot be displayed or - as a pop-up - when you move the mouse pointer over the image, you can place it between the two tags [img=URL]ALT_TEXT[/img]. If you have embedded the image in a post using the first method (‘Embed image’), you have to do it yourself. You have to replace the scaling that was inserted in the opening zmg tag with the URL of the image and replace the automatically inserted image URL between the opening and closing zmg tag with the alt text.
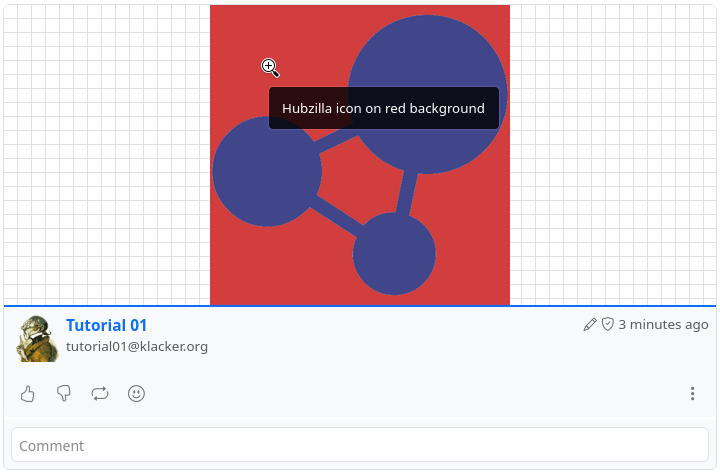
Example:
The image was embedded and the code
[zrl=https://klacker.org/photos/tutorial01/image/cd747cd9-3f05-42cd-94cc-91c7368c5a18][zmg=520x520]https://klacker.org/photo/cd747cd9-3f05-42cd-94cc-91c7368c5a18-2.png[/zmg][/zrl]
was created automatically, then it must be changed to insert the alt text ‘Hubzilla icon on red background’, for example:
[zrl=https://klacker.org/photos/tutorial01/image/cd747cd9-3f05-42cd-94cc-91c7368c5a18][zmg=https://klacker.org/photo/cd747cd9-3f05-42cd-94cc-91c7368c5a18-2.png520x520]Hubzilla icon on red background[/zmg][/zrl]
bbCode
Text Decoration
| BBcode syntax | Rendered text |
|---|---|
[b]bold[/b] |
bold |
[i]italic[/i] |
italic |
[u]underlined[/u] |
underlined |
[s]strike[/s] |
~~strike~~ |
[color=red]red[/color] |
 |
[hl]highlighted[/hl] |
 |
[font=courier]some text[/font] |
 |
[quote]quote[/quote] |
 |
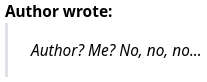
[quote=Author]Author? Me? No, no, no...[/quote] |
 |
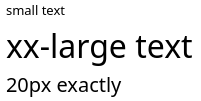
[size=small]small text[/size][size=xx-large]xx-large text[/size][size=20]20px exactly[/size]Size options include: xx-small, small, medium, large, xx-large |
 |
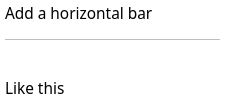
Add a horizontal bar [hr] Like this |
 |
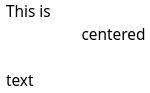
This is [center]centered[/center] text |
 |
Code blocks
Code can be rendered generically in a block or inline format (depending on if there are new line characters in the text), or you can specify a supported language for enhanced syntax highlighting. Syntax highlighting requires a suitable rendering plugin such as hilite. Supported languages with the hilite plugin include php, css, mysql, sql, abap, diff, html, perl, ruby, vbscript, avrc, dtd, java, xml, cpp, python, javascript, js, json, sh .
If a rendering plugin is not installed or an unsupported language is specified, the output for syntax highlighted code blocks is the same as the block format code tag.
| BBcode syntax | Output |
|---|---|
[code]function bbcode() { }[/code] |
function bbcode() { } |
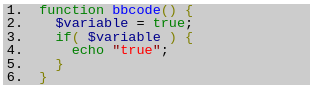
[code=php]function bbcode() { $variable = true; if( $variable ) { echo "true"; } }[/code] |
 |
[nobb][nobb]This is how [i]you[/i] can [u]show[/u] how to use [hl]BBcode[/hl] syntax[/nobb][/nobb] |
This is how [i]you[/i] can [u]show[/u] how to use [hl]BBcode[/hl] syntax |
Lists
| BBcode syntax | Rendered list |
|---|---|
[ul] [*] First list element [*] Second list element [/ul] |
- First list element - Second list element |
[ol] [*] First list element [*] Second list element [/ol] |
1. First list element 2. Second list element |
[list=A] [*] First list element [*] Second list element [/list] The list type options are 1, i, I, a, A. |
A. First list element B. Second list element |
[dl terms="b"] [*= First element term] First element description [*= Second element term] Second element description [/dl] The terms style options can be any combination of: bbold iitalic uunderline mmonospace llarge hhorizontal — like this defintion list |
First element term First element description Second element term Second element description |
Tables
| BBcode syntax | Rendered table |
|---|---|
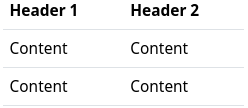
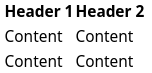
[table border=0] [tr] [th]Header 1[/th][th]Header 2[/th] [/tr] [tr][td]Content[/td][td]Content[/td][/tr] [tr][td]Content[/td][td]Content[/td][/tr] [/table] |
 |
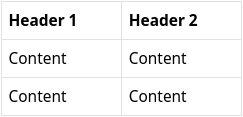
[table border=1] [tr] [th]Header 1[/th][th]Header 2[/th] [/tr] [tr][td]Content[/td][td]Content[/td][/tr] [tr][td]Content[/td][td]Content[/td][/tr] [/table] |
 |
[table] [tr] [th]Header 1[/th][th]Header 2[/th] [/tr] [tr][td]Content[/td][td]Content[/td][/tr] [tr][td]Content[/td][td]Content[/td][/tr] [/table] |
 |
Links and Embedded Content
| BBcode syntax | Output |
|---|---|
[video]video URL[/video] [audio]audio URL[/audio] |
VIDEO AUDIO |
[video='URL_TO_POSTER']video_link[/video] |
 |
[url=https://hubzilla.org]Hubzilla[/url] |
Hubzilla |
An image [img]https://example.org/image.jpg[/img] in some text |
 |
Hubzilla spezific codes
| BBcode syntax | Output |
|---|---|
Magic-auth version of [url] tag [zrl=https://hubzilla.org]Identity-aware link[/zrl] |
 |
Magic-auth version of [img] tag [zmg]https://hubzilla.org/some/photo.jpg[/zmg] |
Image is only viewable by those authenticated and with permission. |
Observer-dependent output:[observer=1]Text to display if observer IS authenticated[/observer] |
|
[observer=0]Text to display if observer IS NOT authenticated[/observer] |
|
[observer.language=en]Text to display if observer language is English[/observer] |
|
[observer.language!=de]Text to display if observer language is not German[/observer] |
|
[observer.url] |
channel URL of observer |
[observer.baseurl] |
website of observer |
[observer.name] |
name of observer |
[observer.webname] |
short name in the url of the observer |
[observer.address] |
address (Nomad/Zot-id) of observer |
[observer.photo] |
profile photo of observer |
What is a spoiler? [spoiler]Text you want to hide.[/spoiler] |
What is a spoiler? Click to open/close |
[toc data-toc='div.page-body' data-toc-headings='h1,h2'] Create a table of content in a webpage or wiki page. Please refer to the original jQuery toc to get more explanations. Optional param: 'data-toc'. If omitted the default is 'body' Optional param: 'data-toc-headings'. If omitted the default is 'h1,h2,h3' |
|
[rpost=title]Text to post[/rpost] The observer will be returned to their home hub to enter a post with the specified title and body. Both are optional |
[[baseurl]/rpost?f=&title=title&body=Text+to+post](file:///home/daniel/Fediverse/orig doc/member/[baseurl]/rpost?f=&title=title&body=Text+to+post) |
This requires the qrator plugin. [qr]text to post[/qr] |
 |
This requires a suitable map plugin such as openstreetmap. [map] |
Generate an inline map using the current browser coordinates of the poster, if browser location is enabled |
This requires a suitable map plugin such as openstreetmap. [map=latitude,longitude] |
Generate a map using global coordinates. |
This requires a suitable map plugin such as openstreetmap. [map]Place Name[/map] |
Generate a map for a given named location. The first matching location is returned. For instance "Sydney" will usually return Sydney, Australia and not Sydney, Nova Scotia, Canada unless the more precise location is specified. It is highly recommended to use the post preview utility to ensure you have the correct location before submitting the post. |
[©] |
© |